Introducing My Command Engine (MyCE)
An improved Linux alias alternative to running frequent, long, or difficult-to-remember commands

The Linux terminal is crucial for a variety of tasks from file navigation to software management. However, for advanced users, repeatedly typing complex, multi-argument commands with slight variations can become tedious and extremely time consuming. In my job, I recently found myself constantly reentering long podman commands on the terminal, often with only minor adjustments. Searching through command history (CTRL+r) is the typical solution to recall and reuse a previous command, or copy/pasting from a cheat sheet, but neither of these methods were efficient, especially since arguments within the command often changed depending on the project (ie. directory) that I was working in. I needed another solution.
Like any seasoned developer, when something is tedious, repetitive and/or time-consuming, it is time to write a script to help make life more efficient. In this case, I created MyCE (My Command Engine).
What is MyCE?
MyCE (pronounced “mice”) is a Bash script that goes beyond traditional aliases by adding context awareness, variable substitution, being easy to configure and update, all within a simple script that should run in any Linux terminal. With MyCE, managing your commands becomes faster and more flexible than traditional aliases, creating a smoother and more productive command-line experience.
Once you have everything configured, instead of having to enter confusing or long commands like:
tar -xvzf file.tar.gz
find . -type f -name "filename"
podman run -it -n projA-mongodb -p 27017:27017 -v $(PWD):/var ubuntu:22.04
podman exec -it projA-mongodb mongosh -u adminUser -p myS3cr3t
You can instead run commands like:
my extract file.tar.gz
my find.file "filename"
my pod.run
my pod.exec
Isn’t This What Alias is For?
Yes and no. Aliases can be helpful for frequently used commands, but they lack flexibility:
- They are static and don’t adapt to different workspaces (not context-aware).
- Editing
.bashrcor.zshrc(so they’re persistent) is cumbersome and requiressource-ing the file each time a change is made.
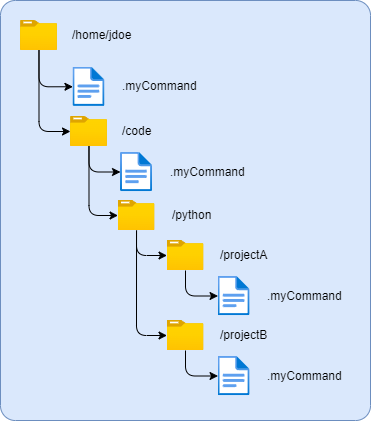
MyCE overcomes these limitations by allowing a local configuration file (.myCommand) within each directory, but also walks the directory tree to find other instances of this file in ancestors. This allows you to store common commands, as well as workspace-specific commands, that can be dynamically loaded, overridden, or extended as needed.
Key Features of MyCE
1. Flexible Configuration with `.myCommand` Files
The .myCommand file in each directory serves as a local configuration file. As mentioned before, the script searches for all instances of the .myCommand files, beginning in the current directory and then walking up the directory tree until it reaches root (/). Once all files have been located in the directory tree, the script will attempt to load the .myCommandfile from the current user’s $HOME directory first, then works down from root back to the $PWD, loading and merging any definitions it finds. Conflicting key names are resolved with the last value overriding previous versions. This way, you can define common commands in ~/.mycommand, or a project root directory, and adding more specific or local commands within the current workspace without affecting other projects.
It is also possible to define a command in ~/.myCommand that references a variable which is defined in another file (such as WORKSPACE_ROOT ). This allows you to make changes to the command value in ~/.myCommand, and define the value that is unique to a directory or repo where it may be different. We’ll dive deeper into this later with some examples.
2. Commands to Manage Configurations and Execution
To run the script, enter my followed by one of the following actions:
list [-l]: Lists all available commands.<KEY> | <SECTION.KEY>: Runs a command as defined in the.myCommandfile(s), using context-specific values.update [diff]: Downloads the latest version of the script from a GitHub repository.helpandversion: Display help information and version.set <key> <value>: Adds or updates commands in the.myCommandfile of the current directory *
*The setcommand has not received a lot of testing since the INI-style structure of .myCommand is easy to modify in your favorite terminal editor.
3. Verbose and Dry-Run Options
The script includes a -v option for verbose output (increased verbosity can be achieved with additional -vv, -vvv flags) and a-d option for a dry run. These options must immediately follow my, before the action
Increasing verbosity can come in handy when attempting to understand how a command is being generated in context from the current directory. The verbosity level can be increased with multiple v’s ( -v, -vv, -vvv, etc.). The most log prints currently used is level 3 (-vvv).
The dry run (-d ) flag is helpful to view the final command that would be executed if you’re unsure how the command would expand.
Installing
The easiest way to install MyCE is to download it to your /usr/local/bin folder. Since you obviously are comfortable in the terminal world, you can use curl to download directly from GitHub. Don’t forget to enable execution for all users afterwards.
# You'll likely need to run these commands as sudo
curl --output /usr/local/bin/my https://raw.githubusercontent.com/jerrens/MyCE/refs/heads/main/my
chmod +x /usr/local/bin/my
Using MyCE
Once the script is installed, you use it by entering my on the terminal, followed by an action or a command key to expand and execute. A simple sanity check to make sure everything is working is to run my version .
Loading and Parsing Commands
As mentioned before, when running the myscript, the directory tree is walked up from root to the current directory, reading all .myCommand files along the way. It merges any values it finds, allowing values in the most specific file (those closest to the current directory) to take precedence.
Managing Commands
The easiest way to manage your commands is to manually edit the .myCommand file in your preferred text editor. Let’s be honest, if you’re in the terminal and executing enough commands that you’re looking for a shortcut, then you most likely know your way around an INI file.
Just in case you aren’t, here is a brief recap.
- Each line can contain a
key=valuepair. - The
keyis the command/alias you’ll reference when running the script. (ie.my key [...]) . It should start with a letter and cannot contain the equal sign nor a space, and is recommended to be all lower-case. - The
valueis the long form of the command that will be expanded and executed when you runmy key. - Section names are surrounded in square brackets (ie.
[size]) and they are an optional mechanism you can use to organize your.myCommandfile contents. If used, then to reference the commands within a section, prepend the key with the section name, delimited with a.. - Comments can entered by starting the line with either
;or#.
Example:
# ~/.myCommand

find=find ${PWD} -name "$1" 2>/dev/null

[size]
disk=df -h
dir=du -sh *
With the above contents in your .myCommandfile, you can run the following commands:
my find missing.text
my size.disk
my size.dir
Since the example .myCommand file above was defined in the user’s home directory, those commands are available no matter which directory they are called from. If the commands were stored in a different directory such as ~/code/.myCommand , then those commands would only be available if the my script was executed while in the ~/code directory or a descendent (ie. ~/code/javascript ).
There is also a set action available in MyCE (my set <key> <value>) that you can use to append a new command to the .myCommand file in the current directory.
To add a new command to a section, you can use the format: my set [section.]<key> <value> . If the key contains multiple . chars, the first will be used as the delimiter between the section name and the key.
To be honest, the set action has not had extensive testing, so you may want to confirm the command is expanding as expected using the dry run (
-r) option. For simple commands it has worked fine, but if the value contains variables or dynamic arguments ($1, $2), it may not work as expected.
Viewing Available Commands
Sometimes, you may forget what key you used as a shorthand for a command, or you may have forgotten if a key is available in your current working directory. If you find yourself in this situation and need your memory jogged or to get your orientation, just run the command my list . This will present you with a list of all command keys that are available in the current directory context.
The default is for the keys to be listed in columns, but if you prefer each command to be listed on a separate line, you can add the -l option ( my list -l ).
Running Commands
Once you have your .myCommand file(s) created and in place, you can run them by entering my key .
Appending Arguments
If you’re using MyCE to shorten the first part of a command, any additional arguments entered will be appended after the value during expansion.
# ~/.myCommand

extract=tar -xvzf
If you have the above ‘extract key defined, then you can provide the file name by entering: my extract file.tar.gz and the command tar -xvzf file.tar.gz will be executed.
Positional Arguments
If your command cannot simple have dynamic arguments appended to the end and need to be placed in specific locations of the command, then positional arguments ($1, $2, etc) can be used.
If your command contains positional arguments, then the arguments entered after the key will be used to fill those positions. If more arguments are given than are referenced, then arguments will be shifted up to the highest referenced positional argument, and the remaining arguements will be appended to the end of the command when expanded.
> cat ~/.myCommand

[test]
pos=echo $10 "$1" $5

> my test.pos $(seq 1 15)
# 10 1 5 11 12 13 14 15

# Since the highest position argument was $10,
# arguments 11 through 15 are appended.
Defined Variables
Variables can be defined in the .myCommand files and referenced in the values of command keys. Variables are stored in the same KEY=value syntax, and should start with an upper-case character (A-Z). It is recommended to use all upper-case characters, and _, but the first character must be upper-case. This is simple to keep the variables from being listed as a key in the my list output.
Like programming, this is beneficial if a value is used in multiple commands and may need to be changed. By leveraging a variable, you only need to change the value in once place and then all commands are updated.
This becomes even more powerful when you define a command key in the user’s home directory, but have different values defined for a variable within different folders. Running the same my <key> command from different folders will result in different values of the variable being used and the executed alias being context aware.
For a simple example, imagine the following setup:
# /home/jdoe/.myCommand
WORD=Moon
OTHER_WORD="Red Balloon"

test=echo "Goodnight ${WORD}"
test2=echo "Goodnight $OTHER_WORD"
# /home/jdoe/code/projectA
WORD=Mouse# /home/jdoe/code/projectB
WORD=ClockNow, when running the command from the following directories, the output would be:
~$ my test
# Goodnight Moon

~$ my test2
# Goodnight Red Balloon

~/code$ my test
# Goodnight Moon
# Note: This is the same output since only the ~/.myCommand file was loaded

~/code/projectA$ my test
# Goodnight Mouse
# Note: The test command is defined in ~/.myCommand,
# but the .myCommand file in the projectA folder redefined WORD

~/code/projectA/some/really/deep/subfolder$ my test
# Goodnight Mouse
# Note: Still within the context of the ~/code/projectA/.myCommand definition

~/code/projectB$ my test
# Goodnight Clock

~/code/projectB$ my test2
# Goodnight Red Balloon
# Note: Nothing redefined OTHER_WORD, so the original value is used.
Note: The command may be surrounded with quotes or not. Everything to the right of the equal sign is used when expanded. Also, the variable reference may be surrounded with curly-brackets, or they may be left off; both reference styles are supported with variables.
The above example is simplified, but imagine defining commands for docker or podman once in ~/.mycommand that reference a $CONTAINER variable, then inside each of your repo folders, you include a .myCommand file that simply (re)defines the CONTAINER variable (key) to the container name that should be used while in the context of that repo.
This can also be used to avoid switching directories when you’re several folders deep in a repo and want to run a command referencing a config file:
[pod]
up=podman play kube "$WORKSPACE_ROOT/pod.yaml"
By chaining the commands as above, no matter what sub-directory you’re in, running my pod.up will correctly start the podman container using the definitions from pod.yaml.
Referencing Other Command Keys
You may also reference another command keys within the value of a command. Sometimes you may have a second command that is very similar to another, but with additional arguments.
[pod]
log=podman logs $CONTAINER
log+=${pod.log} --follow --tail 50
By using this approach, if changes are made to the pod.log command, they will automatically be included when the pod.log+ command is used.
In the example above, since the referenced command is within the pod section and the command required a . , it is necessary to surround the command reference with curly brackets. If the command was defined outside of a section group, then it could be referenced with just the $ prefix.
Another way this feature can be used is when chaining commands using && and ||. In my ~/.myCommand file, I typically include a _confirm command key (the leading underscore hides the key from being printed in the my list output).
~$ cat .myCommand
# ~/.myCommand

_confirm=read -rp "Are you sure? [Y/n]: " -n 1 && echo && [[ $REPLY =~ ^[Yy]$ ]];

[test]
# Prompts the user for a confirmation,
#  "Confirmed" printed if they answer "Y" (replace with desired command to run)
#  "Cancelled" otherwise
confirm={ $_confirm } && echo "Confirmed" || echo "Cancelled"

~$ my test.confirm
Are you sure? [Y/n]: Y
Confirmed
~$ my test.confirm
Are you sure? [Y/n]: n
Cancelled
A warning — sometimes these advanced variables and command references can unintentionally lead to circular references, resulting in an infinite loop when MyCE expands the value. To avoid these situations, the script is currently designed to not expand more than 15 levels deep. If you get the message “There appears to be an infinite loop in your command references!” you have hit this expansion limit.
Updating
After the first installation has been done, updating the script to the latest version is as easy as running my update (you’ll be prompted to elevate to sudo/dzdo if needed).
Those who are security conscious may be wary of blindly downloading a script without reviewing, so a diff option is available with the update action that will download the file to /tmp and then use the native diff command to show the changes. Of course you can always review the changes in the GitHub repo at https://github.com/jerrens/MyCE.
~$ my update diff
The following are the changes between your current version and the latest version on GitHub:

# <Changes will be listed here>
EOT                                                                                                /    EOT

---------------------------------------------------------------------------
You can run 'my update' to update to the latest version

~$ my update
This should be run as root.  Attempting to elevate permissions...

Downloading latest version from GitHub...
    https://raw.githubusercontent.com/jerrens/MyCE/refs/heads/main/my


Modifying permissions...
Update finished!

~$ my update diff
You are already running the latest version!
Conclusion
MyCE is a powerful alternative to static aliases, especially if you need a dynamic, context-aware command management solution. By allowing commands to be defined, overridden, and executed based on the current directory it provides a flexible solution for managing complex container operations across multiple projects.
If you often find yourself juggling commands across multiple projects, consider giving this script a spin to see if it helps in your daily workflow.
If you find a bug or have a suggestion on a feature to add to MyCE, please open a GitHub Issue, or better yet submit a PR for consideration.
The Discussions page has been enabled on the repo as well. This is a good area to gauge interest in a feature idea with the community and also to share the command keys you’ve come up with for your .myCommand files and help others kick-start their setup.
Thanks for your interest and reading! Feel free to leave a comment to let me know what you think!